Balance Beam Brackets Comparison: Surface vs Fit
Reference Standard: Relevant material and performance testing standards, including ASTM A653/A653M for zinc-coated steel sheet where applicable, plus dimensional inspection, visual surface review, and quality management principles aligned with ISO 9001.
Short Answer
Balance Beam Brackets Comparison: Flat Plate Appearance Versus Door Balance Reference Behavior
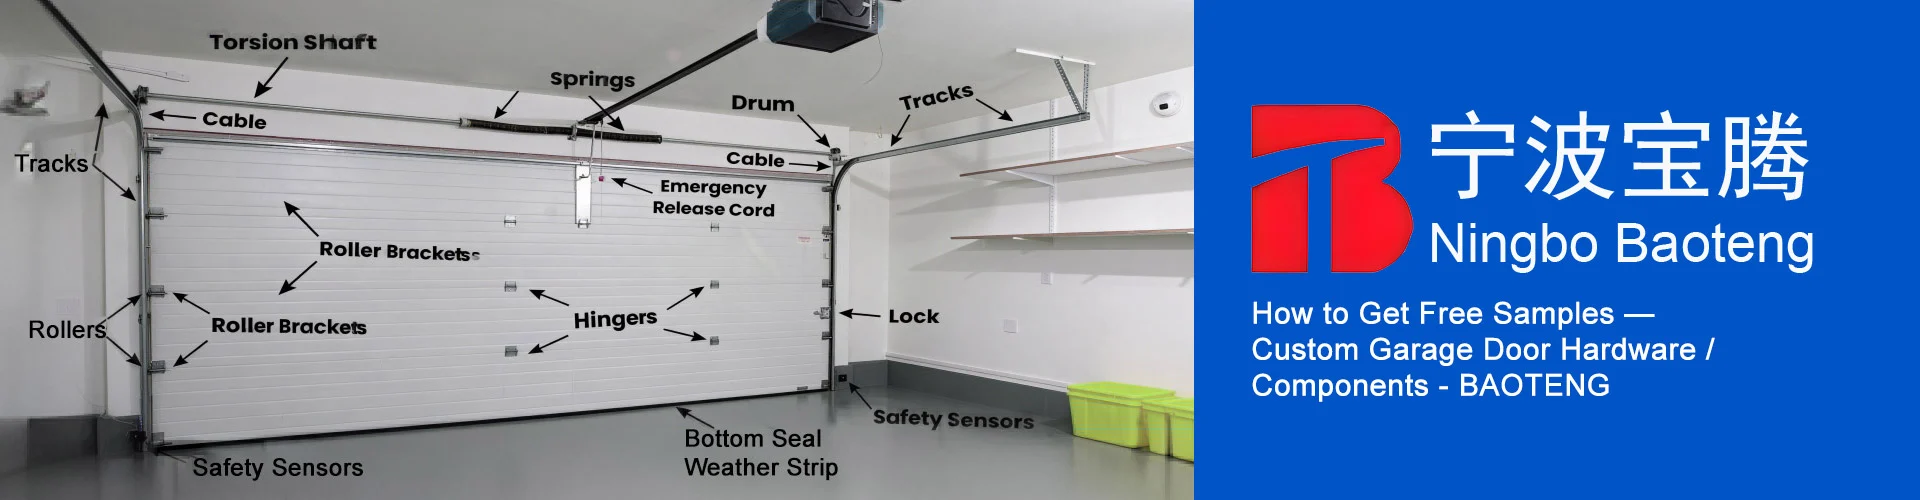
A flat metal bracket may look simple in a garage door hardware catalog, but a balance system bracket behaves more like a reference point than a decorative support. The confirmed catalog identity for the relevant product is BT-A309 Balance System Bracket, mit Thickness: 1.5mm und Finish: Pre-Galvanized. That is the factual boundary. The catalog does not provide a steel grade, load rating, hole diameter, coating thickness, salt spray hours, fatigue cycle result, or certified door weight range. Any article that treats this bracket as a fully validated heavy-load component without those records would exceed the evidence.
The useful comparison is between two ways of reading the part. The first is visual: a small triangular or balance-system bracket with a metallic surface. The second is functional: a 1.5mm pre-galvanized metal plate that must sit between the door balance system, fastener pressure, mounting surface, and repeated movement. In that role, the bracket becomes a small geometric reference. If it is installed slightly out of plane, tightened unevenly, or forced against an uneven contact surface, the visible issue may appear minor, but the installation rhythm changes. Screws or bolts may enter at a slight angle, the bracket face may not seat evenly, and the surrounding balance hardware may inherit that small positional error.
A practical edge scenario can be modeled without inventing new catalog data. Imagine a semi-exposed garage environment where the bracket is installed near a balance system area that experiences repeated door movement, air humidity, and light vibration. During the initial stage, the 1.5mm sheet may appear stable because the visible galvanized surface is intact. During the middle stage, repeated tightening, loosening, and vibration can reveal whether the mounting face is flat enough to keep consistent pressure. In a more severe stage, a slightly uneven plate may show witness marks around fastener positions, especially if the bracket is repeatedly adjusted during installation.
A cross-dimensional comparison also matters. A thicker, fully specified structural bracket with a declared load rating can be evaluated through load tables and fatigue data. The BT-A309 cannot be described that way from the catalog alone. Its safer article angle is catalog-based fit comparison: confirmed identity, confirmed thickness, confirmed surface type, and the inspection questions needed before use.
For buyers reviewing garage door hardware from Baoteng garage door component resources, the first decision is not whether the bracket looks strong. The better decision is whether the supplier can keep the BT-A309 identity, 1.5mm thickness, und Pre-Galvanized finish consistent across batches while also checking the hole positions, cut edges, surface scratches, and plane contact behavior.
| Comparison Point | Confirmed for BT-A309 | Safe Interpretation | Unsupported Claim to Avoid |
|---|---|---|---|
| Product identity | BT-A309 Balance System Bracket | Catalog-level product matching | Any alternate model assumed equivalent |
| Dicke | 1,5 mm | Thin metal bracket behavior should be inspected | Heavy-load rating without data |
| Oberfläche | Vorverzinkt | Surface protection exists before forming or cutting | Certified corrosion lifespan |
| Application context | Balance system bracket | Garage door hardware reference and support zone | Door weight capacity |
| Inspection focus | General QC logic | Hole, burr, flatness, surface condition | Third-party certification |
The Cut Edge Question: Pre-Galvanized Surface Versus Exposed Boundary Risk
The phrase Vorverzinkt is useful, but it must be read precisely. It means the surface condition is already galvanized before the finished bracket is supplied, but it does not automatically prove that every cut edge, punched hole, or rubbed area has the same protective continuity as the broad flat surface. This is not a criticism of the bracket. It is a normal material reading for formed or cut sheet-metal components.
In a zinc-coated steel surface, the broad face has a protective zinc layer that helps reduce direct exposure of the base metal. At the boundary zones, the physical story becomes more complex. A punched hole, cut edge, sharp corner, or rubbed contact point can have a different surface condition from the untouched face. If the bracket is handled in bulk, installed with tools, or tightened under bolt pressure, the surface may receive fine scratches. If humidity is present, those small discontinuities become more relevant than the visual shine of the main face.
The extreme environment model for this section is a humid storage-to-installation timeline. In the first stage, the bracket is stored indoors and appears clean. The broad pre-galvanized surface performs as expected for a protected metallic component. In the second stage, parts rub during handling or the installer adjusts the bracket several times, creating minor abrasion near holes and corners. In the final stage, a semi-exposed garage with moisture and airborne contaminants creates a higher risk around exposed boundaries. The issue is not that the whole bracket fails. The issue is that surface uniformity and edge condition can drift apart.
A useful test comparison is visual inspection versus boundary inspection. Visual inspection asks, “Does the face look clean?” Boundary inspection asks, “Are the hole edges, cut lines, and corner areas free from deep scratches, burrs, rust points, or bare metal exposure?” For a 1.5mm Pre-Galvanized Balance System Bracket, the second question is more valuable because the bracket’s small size makes edge quality proportionally important.
A responsible article should not claim salt spray approval, coating thickness, or corrosion certification unless those records are supplied. The safer wording is: the catalog confirms a pre-galvanized finish; edge, hole, and scratch inspection should be controlled separately during factory review and incoming inspection.
KEY TAKEAWAYS
- Early rust risk is more likely to appear at cut edges, punched holes, or scratched contact zones than on untouched flat surfaces.
- A clean metallic face does not prove that every boundary area has the same protective condition.
- For a 1.5mm bracket, small burrs or scratches can become installation and surface-quality signals before larger problems appear.
Bolt Pressure Memory: A 1.5mm Bracket Compared Before and After Tightening
A bracket does not only exist as a catalog shape. Once tightened, it begins to record pressure. This “pressure memory” is a practical way to compare a bracket before and after installation without claiming unsupported laboratory results. In the BT-A309 case, the confirmed thickness is 1,5 mm, so post-tightening observation is more meaningful than broad claims about structural capacity.
When a bolt or screw clamps a thin metal bracket, pressure is not distributed perfectly across the entire part. It is concentrated around the fastener seat, hole edge, washer contact, and nearby plate surface. If the mounting face is flat and the bracket is properly seated, pressure marks may remain controlled and symmetrical. If the bracket is pulled against an uneven surface, one side may receive higher local compression. The result can be a shallow indentation, a tilted contact mark, or a slight change in the visible seating pattern.
At the microscopic level, the metal plate is resisting elastic bending, local compression, and frictional movement at the same time. The zinc-coated surface also participates in this contact system. A washer or bolt head may polish the surface, mark it, or cut through a weak area if there is excessive movement. This is why post-tightening observation can reveal assembly discipline. The problem is not only whether the hole exists. The question is whether the bracket still behaves as a stable contact element after clamping.
A simple cross-system comparison can be made between three inspection stages:
| Stage | What to Observe | Practical Meaning | Response |
|---|---|---|---|
| Before tightening | Flatness, hole cleanliness, surface scratches | Confirms the bracket is ready for installation | Reject visibly distorted or sharp-edged pieces |
| During tightening | Bolt seating angle, washer contact, plate movement | Shows whether pressure is being applied evenly | Stop if the bracket shifts or rocks |
| After tightening | Indentation, coating damage, contact symmetry | Reveals pressure memory and local stress behavior | Recheck fit before repeated operation |
| After movement | Loosening marks, fresh scratches, edge rubbing | Indicates whether vibration is changing contact | Review installation surface and fastening method |
| Before packing | Part separation, face protection, quantity check | Reduces avoidable transport marks | Use controlled packing and batch separation |
An extreme fatigue model can be described in cautious terms. In the early period, the bracket may retain its shape and show only normal contact marks. In the mid-period, repeated vibration and adjustment may enlarge witness marks around the fastener area. In the high-stress period, especially if the bracket is not seated flat, local pressure can encourage slight plate distortion or surface marking. This model is not a claim that the catalog tested these stages. It is a physically reasonable inspection lens for thin pre-galvanized garage door hardware.
PRO-TIP / CHECKLIST
- Confirm that the part identity matches BT-A309 Balance System Bracket before comparing samples.
- Measure or verify the 1.5mm thickness during incoming inspection.
- Check the pre-galvanized surface for scratches, rust dots, and transport marks.
- Inspect cut edges and holes for burrs before installation.
- Test the bracket against the intended mounting surface for rocking or uneven contact.
- Observe the fastener contact mark after tightening rather than judging only the unused part.
- Avoid describing the bracket as load-rated unless separate load data is provided.
- Request a drawing or sample confirmation when hole position is critical.
Quotation-Safe Evidence: Catalog Data Compared With Load-Part Assumptions
The final comparison is between quotation-safe evidence und load-part assumptions. For triangle brackets and balance beam brackets used in garage door systems, buyers often want a fast answer: “Will this part support the system?” The safer industrial answer is more disciplined: “The catalog confirms BT-A309, Balance System Bracket, 1.5mm thickness, and Pre-Galvanized finish; load capacity, steel grade, coating thickness, and fatigue results must be confirmed separately before performance claims are made.”
Four factory-level controls help keep the quotation conversation grounded.
1. Incoming thickness and surface verification
Execution Protocol: Incoming inspection should verify that the bracket batch matches the catalog identity and the stated 1.5mm thickness. The inspector should review the broad surface, cut edges, hole areas, and any visible handling marks. The goal is not to create a new certification but to prevent a mismatch between catalog description and delivered hardware.
Material behavior expectation: When thickness and surface condition remain consistent, the bracket is more likely to seat predictably during installation. The broad pre-galvanized face should remain visually stable under normal handling, while cut edges and holes still require separate observation.
Hidden cost and risk control: Over-inspection can slow production if every dimension is checked on every piece. A balanced approach is batch sampling with clear rejection criteria for obvious warping, severe scratches, rust, or sharp burrs.
2. Hole and edge condition review
Execution Protocol: The factory should check punched or cut areas for burrs, rough edges, deformation, and visible coating disruption. This can be done through visual review, touch-safe edge checks, and sample trial alignment when matching hardware is available.
Material behavior expectation: Cleaner holes reduce the risk of uneven fastener seating. Smoother boundaries also reduce the chance that installation pressure will concentrate at a raised burr or sharp edge.
Hidden cost and risk control: Edge deburring may add handling steps. The risk is over-polishing or creating new scratches. The practical control is targeted correction only where burrs affect safety, fit, or fastening quality.
3. Flatness and mounting face comparison
Execution Protocol: A simple flatness check can compare the bracket face against a reference surface or sample mounting plate. The objective is to see whether the part rocks, twists, or leaves a visible gap before tightening.
Material behavior expectation: A flatter contact face should distribute bolt pressure more evenly. For a 1,5 mm component, even small deviations can be more noticeable after tightening than on a thicker part.
Hidden cost and risk control: If the inspection standard is too strict without drawings, normal production variation may be rejected unnecessarily. The safer method is to define what level of rocking or visible distortion affects installation.
4. Packing and surface protection review
Execution Protocol: Before shipment, brackets should be packed to reduce hard metal-to-metal rubbing, especially around corners and hole edges. Quantity checks and separation practices help prevent mixed or damaged parts.
Material behavior expectation: Better packing does not change the bracket’s mechanical properties, but it helps preserve the pre-galvanized surface condition and reduces avoidable scratches before installation.
Hidden cost and risk control: More protective packing can increase material cost and carton volume. The practical solution is not excessive packaging but controlled separation for contact-sensitive surfaces.
| Control Variable | Practical Check | Expected Result | Caution |
|---|---|---|---|
| Dicke | Verify 1.5mm against catalog requirement | More consistent seating behavior | Do not infer load rating |
| Surface finish | Inspect Pre-Galvanized face condition | Better surface-quality confidence | Do not claim salt spray data |
| Edge condition | Review cut and hole boundaries | Lower burr-related assembly risk | Avoid over-polishing |
| Flatness | Compare against reference contact surface | More predictable bolt pressure | Requires agreed tolerance |
| Packing | Reduce hard rubbing between brackets | Fewer avoidable scratches | Balance cost and protection |
Häufig gestellte Fragen (FAQ)
How to balance a garage door?
A garage door should be balanced by adjusting the spring system, not by guessing at bracket force. Brackets such as the BT-A309 should be checked for correct fit, surface condition, and stable mounting, but spring tension work should be handled by a qualified technician because stored energy can be dangerous.
How wide is a garage door?
Garage door width depends on the door design, opening type, and regional building practice. A bracket catalog does not define door width. For balance system brackets, the more relevant issue is whether the bracket model, thickness, hole position, and mounting area match the specific door hardware layout.
How to grease a garage door?
Lubrication usually applies to moving hardware such as rollers, hinges, springs, and tracks, following the door manufacturer’s maintenance instructions. A pre-galvanized bracket is not normally evaluated by grease performance. Inspect it for loose fasteners, scratches, rust points, or deformation during maintenance.
How to fix a garage door sensor?
Garage door sensor problems are usually electrical or alignment-related, not bracket-related. Clean the sensor lens, check power, confirm alignment, and inspect wiring. If the door balance system is also being reviewed, keep that inspection separate from sensor troubleshooting to avoid confusing two different failure paths.
How to change battery in garage door opener?
Most openers use a removable cover or battery compartment on the remote or wall unit. Replace the battery with the specified type and test the opener. This does not affect balance system brackets, but routine opener maintenance is a useful time to visually inspect garage door hardware for looseness or corrosion.
How do you program a LiftMaster garage door opener?
Programming steps vary by model, but they usually involve a learn button and remote pairing sequence. Follow the opener manufacturer’s instructions. Programming does not validate mechanical hardware, so balance brackets should still be checked separately for fit, fastening stability, and surface condition.