First Look: Garage Torsion Spring Balance
Reference Standard: Relevant material and performance testing standards should be confirmed against the buyer drawing, spring wire specification, and load requirement. When a steel spring wire grade is separately specified, buyers may reference recognized organizations such as ASTM 국제 for material test methods and NIST for measurement-traceability principles.
Short Answer
First Look At Garage Door Torsion Spring Rotation Memory
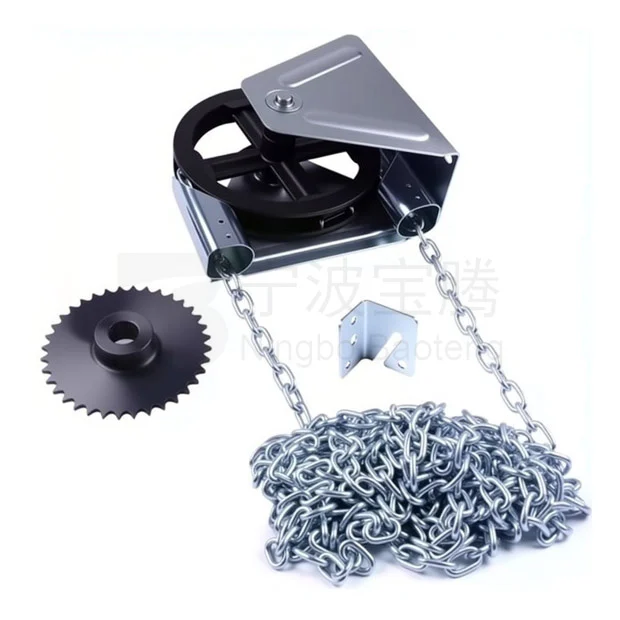
Rotation memory is the practical signal that tells whether a torsion spring still returns with predictable force after repeated door movement. In a garage door system, the spring does not simply sit as a passive metal coil. It stores energy during winding, releases energy during door lifting, and then repeats that cycle across daily opening and closing. The cataloged torsion spring range gives four useful dimensional anchors: BT-SP408 with 50 mm inside diameter and 5.0–6.8 mm wire diameter, BT-SP409 with 65 mm inside diameter and 6.5–8.0 mm wire diameter, BT-SP410 with 93 mm inside diameter and 7.0–10 mm wire diameter, 및 BT-SP411 with 132 mm inside diameter and 7.0–10.5 mm wire diameter. These numbers should not be treated as a simple ladder. They are clues about how much geometric space the spring has for twisting, how the coil interfaces with surrounding hardware, and how force may be distributed during winding.
The underlying mechanism is torsional stress. When the spring is wound, the wire experiences shear stress through its cross-section. A thicker wire can generally resist higher load, but the real behavior also depends on coil geometry, spring length, installation position, shaft compatibility, and door weight. If the installed spring is too light for the door, the system may need excessive winding turns to compensate. If the spring is oversized or mismatched, the door may lift too aggressively or fail to hold balance in the expected position. The result is not always immediate breakage. A more common early signal is drifting balance, where the door feels acceptable on the first test but becomes less consistent after repeated movement.
A useful edge-condition model is a humid residential garage with frequent morning and evening operation. In the early stage, the spring may return cleanly and the door may lift without obvious delay. In the middle stage, small changes appear: the door may hesitate near mid-travel, require more opener effort, or show inconsistent stopping behavior during a manual balance check. In the limit stage, accumulated torsional fatigue and surface wear can make the spring less predictable. The catalog does not provide cycle-life data, so no cycle count should be claimed. The safe engineering statement is that dimensional fit and surface condition must be inspected before winding and monitored during service.
A cross-dimensional comparison helps separate two types of risk. A smaller inside diameter option with a lighter wire range may be suitable only when the door system and shaft arrangement match that geometry. A larger inside diameter option with a heavier wire range may offer different fit and load potential, but it still requires correct matching. The risk is not that one dimension is universally better. The risk is assuming that visible similarity means mechanical equivalence.
KEY TAKEAWAYS
- A door that lifts once but cannot hold a repeatable mid-position may indicate poor spring-force matching.
- Uneven return behavior after repeated operation can appear before visible spring failure.
- Inside diameter and wire diameter must be verified together, not judged as separate loose dimensions.
Surface Layers As A Maintenance-Interval Clue
The catalog records anti-rust oil, galvanized, and electrophoresis finish for the torsion spring items. This surface information should be read as a maintenance-interval clue rather than a lifetime promise. A surface layer can slow visible corrosion, reduce early oxidation exposure, and help protect the spring during handling and installation. It cannot remove the physical reality of repeated twisting, moisture exposure, dust adhesion, and surface abrasion around a garage door system.
A torsion spring works in a mixed environment. Even when the garage is not fully outdoors, it may face wet vehicle tires, seasonal humidity, condensation, temperature swing, airborne dust, and occasional hand contact during installation. These conditions matter because metal fatigue and corrosion are not separate worlds. Corrosion pits can create local stress concentration points. A small surface defect on a loaded spring wire may become a place where repeated torsional stress accumulates faster than it would on a smoother protected surface. This is why surface finish should be inspected as part of service planning.
The three cataloged finish references support different inspection logic. Anti-rust oil suggests temporary surface protection and handling protection. Galvanized finish indicates a zinc-based corrosion-protection approach. Electrophoresis suggests an additional coating process intended to cover surfaces more uniformly than simple contact coating. The catalog does not provide coating thickness, salt-spray hours, adhesion grade, or chemical test results. Those values should not be invented. A responsible article should instead explain how buyers and installers can use the known finish information: inspect whether coverage appears continuous, confirm no obvious scratches or bare metal patches before installation, and avoid storing springs in wet packaging before the job begins.
The edge-condition model here is an installation delayed by weather. Springs arrive at the job site, packaging is opened, and parts remain in a damp garage for several days before installation. In the early period, the surface may still look clean. In the middle period, handling marks, dust adhesion, or moisture spots may appear. In the limit period, exposed scratches or edges can become more vulnerable to oxidation. The correct response is not to claim failure from appearance alone. The correct response is to treat surface condition as a trigger for closer dimensional and mechanical inspection.
A cross-system comparison is useful. Track hardware and brackets often show corrosion as a visual issue first. A torsion spring is different because surface defects occur on a component that stores mechanical energy. The same visible surface mark may carry more operational importance if it sits on an active spring wire rather than on a static non-load-bearing cover. This does not mean every mark is dangerous. It means that finish inspection on a torsion spring should be tied to balance testing and winding verification, not treated as cosmetic grading only.
| Surface clue | Practical meaning | What to inspect | What not to claim |
|---|---|---|---|
| Anti-rust oil | Handling and temporary corrosion protection clue | Dryness, contamination, uneven exposure | Fixed outdoor service life |
| Galvanized finish | Corrosion-protection clue | Coverage continuity, scratches, bare areas | Specific salt-spray hours without test data |
| Electrophoresis finish | Coating-coverage clue | Uniform appearance and edge condition | Guaranteed fatigue resistance |
| Wire diameter range | Load-matching clue | Correct measurement before winding | Universal compatibility |
| 내경 | Shaft and installation fit clue | Fit against the intended system | Automatic torque adequacy |
Installer Marking Logic Before The First Winding Turn
The most expensive installation mistake is often made before the first full winding turn. The torsion spring may be visually similar to another spring in the same job batch, yet the inside diameter and wire diameter may not match the door system. A disciplined installer should not begin by asking whether the spring “looks right.” The better sequence is to mark, verify, separate, and only then wind.
The cataloged data gives four main torsion spring dimensional groups and related PVC torsion spring fillet accessories in 3/4 inch and 6 inch sizes. These PVC items should be treated as associated accessories, not as the source of the spring’s load capacity. Their role is separate from the steel spring’s torsional behavior. Mixing that distinction in the installation note can create confusion: an accessory dimension cannot replace the inspection of spring inside diameter, wire diameter, and finish condition.
A practical pre-winding discipline starts with visible marking. Before installation, the spring body should be identified by model or measured dimension. The inside diameter should be confirmed against the intended shaft or hardware arrangement. The wire diameter should be checked with an appropriate measuring tool, not estimated by eye. The finish should be inspected for handling damage, because winding a visibly damaged or contaminated spring may hide defects once the assembly is under tension. If multiple springs are prepared for the same project, left-side and right-side positions, paired sets, and accessory groups should be separated on the floor or bench before any winding bars are used.
The edge-condition model is a small installation crew working under time pressure. Two springs are unpacked near the door, accessories are placed nearby, and one spring is lifted into position before measurement is completed. In the early stage, nothing appears wrong. In the middle stage, the installer notices that the winding response is not what was expected. In the limit stage, the team may need to unwind, remove, re-sort, and reinstall components, increasing labor time and risk. This is not a warehouse receiving problem; it is a field discipline problem at the moment before mechanical energy is introduced.
A cross-dimensional comparison can be made between visual sorting and measurement-based sorting. Visual sorting is faster but weak when springs share similar surface finish and general form. Measurement-based sorting takes longer but directly controls the parameters that influence fit and balance. For a torsion spring, this extra inspection time is justified because once the spring is under load, correction becomes more difficult and less safe.
PRO-TIP / CHECKLIST
- Confirm the spring model or measured group before positioning it near the door.
- Measure inside diameter and wire diameter before winding begins.
- Keep PVC torsion spring fillet accessories separated from spring-load identification notes.
- Inspect anti-rust oil, galvanized, and electrophoresis surface condition for visible damage.
- Verify paired spring positions before introducing stored energy.
- Record any mismatch before installation, not after balance testing fails.
- Do not use accessory size as a substitute for spring dimensional verification.
From Quiet Operation To Repeatable Door Balance Checks
Quiet movement matters to users, but sound alone is not a reliable measure of torsion spring correctness. A door can sound acceptable during one opener cycle and still fail a manual balance check. The stronger performance question is whether the door shows repeatable behavior across lifting, stopping, and lowering. A well-matched torsion spring should help the system avoid sudden rise, uncontrolled drop, or uneven mid-position drift when the door is tested under appropriate service conditions.
This section must stay separate from spring bumper noise or door-end contact geometry. The torsion spring’s role is not to cushion the final impact at the door end. Its role is to counterbalance door weight through stored rotational energy. That means the real value appears when the system is checked repeatedly: does the door rise smoothly, pause predictably, and descend without forcing the opener to compensate excessively? If the answer changes after repeated movement, the spring may be mismatched, fatigued, contaminated, damaged, or incorrectly wound.
The cataloged dimensional range supports this evaluation. 50 mm, 65 mm, 93 mm, and 132 mm inside diameter options indicate that installation fit is not universal. The wire diameter ranges from 5.0–6.8 mm through 7.0–10.5 mm indicate that force behavior must be evaluated against the door’s load requirement. The surface finish record supports maintenance interpretation, because surface degradation can influence long-term inspection priority. None of these catalog details alone proves a final balance result. They create the factual baseline for inspection.
A practical testing model uses three balance moments. First, check the initial lift feel after installation and adjustment. Second, check whether the door can hold a reasonable intermediate position without immediately falling or rising sharply. Third, repeat the movement after several cycles to see whether the behavior remains consistent. The catalog does not state an official factory test method, so this should be described as common field validation rather than a certified performance standard.
A cross-system comparison shows why this matters. An opener motor can sometimes hide poor spring balance by forcing the door through movement. Manual balance checks reveal whether the spring system itself is doing the counterbalancing work. A door that depends too heavily on the opener may increase strain on other hardware. In that sense, torsion spring inspection is not only about the spring. It is about preventing secondary stress on cables, drums, shafts, tracks, and opener components.
The factory-side control logic should be conservative. A supplier or assembler should verify dimensions, model identity, surface condition, spring symmetry, and packaging separation before shipment. If a buyer requires higher confidence, sampling fatigue-cycle testing, torque or load matching, and documented incoming inspection can be added by agreement. Without a declared test standard in the catalog, the language must remain objective: use measurable checks, avoid unsupported claims, and make the acceptance criteria visible in the order document.
| Validation layer | Required check | Expected decision value | Risk controlled |
|---|---|---|---|
| Dimensional control | Inside diameter and wire diameter measurement | Confirms fit category before winding | Wrong spring selection |
| Surface review | Anti-rust oil, galvanized, and electrophoresis appearance | Identifies handling or exposure concerns | Corrosion-related inspection gaps |
| Pre-winding review | Marking, position, accessory separation | Reduces field correction after tensioning | Installation rework |
| Balance behavior | Repeat lift, pause, and descent checks | Confirms practical system response | Opener overcompensation |
| Packaging control | Model separation and visible labeling | Prevents mixed-size installation preparation | Wrong item used on site |
For buyers looking beyond a single component, the starting point should be a complete garage door hardware review through Baoteng garage door hardware solutions. Internal compatibility across spring, shaft, drum, cable, track, and bracket hardware is usually more important than evaluating the spring in isolation.
자주 묻는 질문(FAQ)
How to change battery in garage door opener?
Open the opener remote or keypad cover, remove the old battery, match the replacement battery type, and reinstall it with correct polarity. If the opener still fails, check whether the issue is actually door balance, sensor alignment, or spring counterbalance rather than battery power.
How to program LiftMaster keypad for garage door opener?
Use the opener’s learn button and follow the keypad programming sequence for that specific LiftMaster model. Programming will not correct a poorly balanced door. If the opener strains after programming, inspect the torsion spring, cables, tracks, and door travel condition.
How to repaint garage door?
Clean the door surface, remove loose paint, sand rough areas, apply a compatible primer if required, and use exterior-grade paint. Avoid painting moving spring, cable, roller, or hinge contact areas. Paint buildup on active hardware can interfere with movement and inspection visibility.
How to reset garage door sensors?
Clean the sensor lenses, confirm both units face each other, check wiring, and verify that the indicator lights are steady. Sensor reset only addresses safety beam issues. If the door reverses because of heavy movement, spring balance and track resistance should also be checked.
How to frame a garage door?
Frame the opening according to the door manufacturer’s required rough opening, header support, side clearance, and track clearance. A correct frame supports hardware alignment. Poor framing can create track misalignment, opener strain, and misleading symptoms that appear similar to spring problems.