Garage Door Pulley Comparison for Cable Fit
Reference Standard: Relevant material and performance testing standards may include dimensional inspection practice, visual coating inspection, and general corrosion evaluation logic such as ASTM B117 for salt spray exposure context, without treating any unlisted salt spray result as verified for this catalog item.
Short Answer
A garage door pulley comparison becomes useful only when it separates verified catalog facts from assumptions. The listed pulley records confirm size, thickness, and galvanized finish, but they do not confirm steel grade, bearing type, bore size, groove radius, cycle life, rated door weight, or certified corrosion hours. That missing data does not make the product unusable; it simply changes how the buyer should read the part.
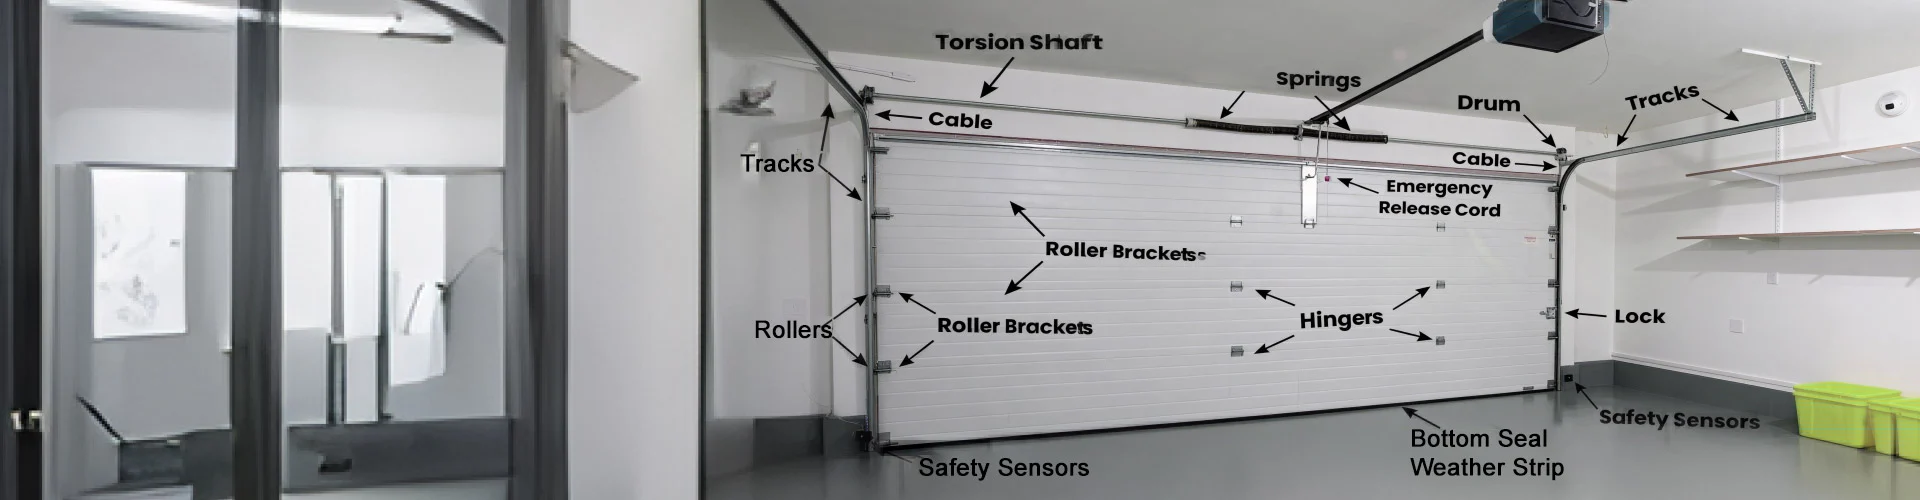
For a moving garage door system, the pulley is not just a round component. It is a cable-direction part, a contact-stress part, a surface-protection part, and a replacement-identification part. When the cable changes direction, the pulley sees repeated low-speed rotation, edge contact, dust exposure, and tension variation. A 3 inch pulley and a 4 inch pulley should not be reduced to a simple stronger-versus-weaker story. The more useful comparison is whether the part belongs to the same path geometry, clearance zone, and replacement position as the original system.
When a Cable Changes Direction, the Pulley Becomes the First Silent Load Reader
The most practical way to compare BT-901 and BT-902 is to begin with cable direction. BT-901 is listed as a 4 inch Pulley с 1.8 mm thickness и galvanized finish. BT-902 is listed as a 3 inch Pulley с 1.5 mm thickness и galvanized finish. These values do not prove a rated load difference, and they should not be converted into an unsupported heavy-duty claim. They are better read as catalog boundaries for size identification, replacement matching, and cable-path review.
When a garage door cable wraps around a pulley, the load does not pass through the pulley as a clean straight pull. The cable creates a curved contact zone. The direction change compresses the cable against the groove while the wheel rotates under repeated motion. Even at low speed, the contact line can move slightly from side to side if the cable is not centered. That is why the pulley can act as an early load reader. It reveals alignment issues before the rest of the door system looks obviously wrong.

An edge extreme scenario model helps make the comparison clearer. Imagine two replacement cases. In Case A, the original cable path uses a wider clearance zone where a 4 inch pulley fits without rubbing the nearby bracket or door hardware. A BT-901-type size boundary may match that spatial logic, provided the other unverified dimensions are checked. In Case B, the door area has tighter geometry and the original pulley is closer to a 3 inch route. A BT-902-type size boundary may be closer to that replacement envelope. The important point is not that 4 inch is automatically better than 3 inch. The important point is whether cable direction, contact centerline, and available clearance agree with the selected part.
A cross-dimensional comparison test can be done without claiming hidden catalog data. Place the candidate pulley in a fixture that simulates the cable direction. Pull a compatible cable across the wheel at a controlled angle, rotate it slowly, and observe three behaviors: whether the cable stays near the center of the groove, whether the wheel shows visible wobble, and whether the cable touches the bracket or surrounding edge. If the cable path changes position during rotation, the system may be reading misalignment rather than pulley weakness.
This section also explains why a supplier page should avoid shallow claims. A buyer does not need a slogan saying the pulley is strong. The buyer needs to know that BT-901 and BT-902 have different size and thickness records, that both are galvanized, and that unverified items still need confirmation before order release. The information gain comes from connecting those records to motion behavior.
Comparison checkpoint: use 4 inch, 1.8 mm, galvanized и 3 inch, 1.5 mm, galvanized as verified identification data, not as unsupported load certification.
Thickness Is Not a Marketing Claim; It Is a Deformation Boundary
Thickness is often used as a selling phrase, but for a garage door pulley it should be treated as a deformation boundary. The catalog provides three usable values: BT-901 pulley thickness 1.8 mm, BT-902 pulley thickness 1.5 mm, и BT-904 bottom pulley bracket thickness 3.75 mm. These are not complete strength specifications. They do not include base material grade, hardness, yield strength, bearing construction, rivet details, or axle geometry. Even so, thickness is still valuable because it tells the buyer where dimensional discipline begins.
A pulley face or bracket does not deform because thickness is written in a catalog. It deforms when force, angle, contact area, and repeated motion create local stress concentration. In a garage door system, the cable may not always load the pulley perfectly in one plane. A slightly tilted bracket, worn cable, uneven door movement, or mismatched replacement size can push the contact line toward one side of the wheel. Once that happens, the rim and center area can receive bending tendency rather than only rotational support.
A useful extreme timeline model can be described in three stages. In the initial stage, the pulley still rotates, but the cable may polish a narrow track on one side of the groove. The surface symptom may look minor, yet it shows the contact line is not balanced. In the middle stage, repeated tension can increase side loading. The pulley may begin to show irregular noise, small wobble, or visible scrape marks where the cable path has moved off center. In the limit stage, the bracket or wheel may no longer maintain the intended cable position, especially if the door system also has spring imbalance or track friction. This model does not require a fabricated load number. It only follows basic mechanical logic: local force plus repeated motion plus misalignment increases deformation risk.
A cross-dimensional comparison test should compare a static measurement with a dynamic fit check. Static inspection confirms whether the part matches the catalog thickness: 1.8 mm for BT-901, 1.5 mm for BT-902, and 3.75 mm for the BT-904 bracket. Dynamic inspection checks whether those parts maintain cable position when rotated under a representative cable angle. Static thickness alone cannot prove replacement success, and dynamic behavior without thickness confirmation cannot protect repeat ordering.
| Catalog boundary | Verified data | What it can support | What it cannot support |
|---|---|---|---|
| BT-901 | 4 inch pulley, 1.8 mm thickness, galvanized finish | Size identification and thickness comparison | Rated load, bearing grade, certified cycle life |
| BT-902 | 3 inch pulley, 1.5 mm thickness, galvanized finish | Smaller size route comparison | Door weight rating or stronger/weaker ranking |
| BT-904 | Bottom pulley, 3.75 mm bracket thickness, galvanized finish | Bracket thickness review and bottom position fit logic | Confirmed hole size, cable groove radius, door model compatibility |
KEY TAKEAWAYS
- A narrow polished track on one side of the groove can appear before obvious pulley failure.
- Rotation noise or visible wobble may indicate side loading rather than only surface wear.
- A bottom pulley bracket that does not sit squarely can shift the cable path even when the pulley size looks correct.
Galvanized Finish Should Be Read at the Edge, Not Only on the Front Face
The catalog confirms that BT-901, BT-902, and BT-904 all use a galvanized finish. This is a meaningful surface record, but it should be interpreted carefully. Galvanizing is commonly used to provide basic corrosion protection by allowing zinc to act as a sacrificial protective layer. Yet the most important inspection zones are not always the broad front surfaces that look clean in a product image. For a garage door pulley, the critical reading points are the edge, groove contact area, formed rim, punched zone, and any location exposed to cable friction or moisture deposits.
This gives the article a different angle from a simple coating promise. A smooth galvanized face may look acceptable while an edge or groove area receives more mechanical contact. If a cable repeatedly touches one zone, the protective layer can experience wear before untouched surfaces show visible change. If the garage environment includes damp air, dust, and limited ventilation, zinc surface products may appear first at edges or trapped debris areas. This should not be exaggerated into guaranteed corrosion failure. It is a practical inspection warning: the coating record is real, but its behavior depends on geometry and use.
The edge extreme scenario model starts with a semi-outdoor garage where moisture enters during rainy weather and dust remains near the lower hardware. During the first phase, galvanized surfaces may still appear bright or slightly dull, with no functional issue. During the second phase, cable-contact zones and formed edges may begin to show different surface tone because friction and moisture are not evenly distributed. During the third phase, any area where the protective layer has been mechanically reduced may become a more sensitive inspection point. The system may still operate, but the buyer should treat edge condition as a maintenance and replacement signal.
A cross-dimensional comparison test should combine visual inspection, wipe inspection, and rotation inspection. Visual inspection checks whether the edge, groove, and bracket corners show white residue, scratches, or exposed substrate. Wipe inspection separates loose surface contamination from more persistent coating change. Rotation inspection confirms whether the cable repeatedly returns to the same edge, which would create localized coating loss. For a supplier or buyer, this is more useful than saying the finish is simply good or bad.
External reference context can be drawn from general corrosion evaluation methods such as ASTM corrosion testing information and broad material protection concepts from NACE International corrosion resources. These references help explain why coating exposure is a process, not a single visual promise. They do not prove a specific test result for these catalog parts.
A procurement note is also necessary. Since the catalog does not list zinc coating thickness, salt spray hours, or post-plating inspection criteria, a buyer should not ask the page to claim those values. Instead, request close-up photos of the groove and edge, sample inspection records, and packaging protection methods if corrosion appearance matters for a specific market.
A Replacement Pulley Should Be Confirmed by Fit Behavior, Not by Name Alone
Replacement fit is where the comparison becomes practical. BT-901, BT-902, and BT-904 give the buyer three verified product boundaries: a 4 inch pulley, a 3 inch pulley, and a bottom pulley with a 3.75 mm bracket thickness record. The missing details are just as important: bore diameter, groove radius, axle structure, bearing structure, compatible cable diameter, rated load, and door weight range are not confirmed in the provided data. That means replacement confirmation must be based on observed fit behavior, not only product name.
A replacement pulley works only if several small behaviors agree. The cable should sit consistently in the groove. The pulley should rotate without obvious catching. The bracket should sit squarely relative to the cable path. The cable should not scrape nearby metal. The selected 3 inch or 4 inch route should match the original space and direction change. The bottom pulley position deserves special attention because it is closer to door movement, cable tension change, and installation variation.
The edge extreme scenario model here is a rushed maintenance replacement. A technician sees a pulley listed as a garage door part and selects it by name. The part may look similar, but if the diameter differs from the original cable route, the cable angle can shift. In the initial phase, the door still moves. In the middle phase, the cable begins to ride toward one side or produce noise. In the limit phase, the pulley may not be the root cause by itself, but it becomes part of a chain involving spring balance, bracket alignment, and track friction. This is why replacement behavior matters more than name matching.
A cross-dimensional comparison test can use four checks. First, compare the original pulley diameter with the catalog boundary, such as 3 inch or 4 inch. Second, compare thickness only as a dimensional clue, not a full strength rating. Third, install or fixture the part and confirm cable centering through several slow rotations. Fourth, inspect the bottom bracket position to see whether it guides or disturbs the cable path. If the pulley passes static measurement but fails cable centering, it should not be treated as a successful replacement.
PRO-TIP / CHECKLIST
- Confirm whether the original replacement route is closer to a 3 inch or 4 inch pulley before judging thickness.
- Check the listed thickness against the catalog value: 1.8 mm for BT-901 and 1.5 mm for BT-902.
- For BT-904, review the 3.75 mm bottom bracket thickness and inspect whether the bracket sits squarely.
- Rotate the pulley slowly with a cable in place and watch whether the cable stays centered.
- Inspect galvanized edges, groove contact areas, and punched zones before packaging approval.
- Do not accept unverified claims about load rating, bearing grade, salt spray hours, or door weight compatibility without supplier proof.
- Separate cosmetic surface marks from functional fit issues during incoming inspection.
- Используйте garage door hardware supplier information as a starting point, then request model-specific drawings or samples for final validation.
A white-paper style acceptance process should include four solutions.
Solution 1: Size-route verification. Execution Protocol: compare the replacement need against the verified 3 inch and 4 inch pulley records, then review the cable path before order release. Material expected behavior: correct size-route matching reduces side loading and keeps contact stress closer to the intended groove area. Hidden cost control: this may require one extra sample check, but it reduces mixed-size returns.
Solution 2: Thickness boundary inspection. Execution Protocol: measure pulley and bracket thickness during incoming or pre-shipment inspection, using catalog values as the reference. Material expected behavior: stable thickness control supports repeatable fit and reduces unexpected flex tendency. Hidden cost control: measurement should not be used to claim strength unless material grade and load testing are separately verified.
Solution 3: Edge-focused galvanized review. Execution Protocol: inspect grooves, cut edges, formed rims, and bracket corners instead of only the visible front face. Material expected behavior: early surface changes become easier to detect before broad corrosion appearance. Hidden cost control: avoid rejecting parts for removable dust or handling marks without confirming actual coating breakdown.
Solution 4: Dynamic cable-fit simulation. Execution Protocol: place the pulley or bottom pulley in a simple fixture and rotate it with cable contact through several slow cycles. Material expected behavior: smooth cable centering reduces localized wear tendency. Hidden cost control: the test must use a realistic cable path, or it may create false failures that do not match field conditions.
| Inspection variable | Practical test baseline | Expected observation | Risk if ignored |
|---|---|---|---|
| Pulley diameter route | Compare 3 inch or 4 inch boundary | Cable angle remains close to original path | Cable shift or bracket scrape |
| Pulley thickness | Check 1.5 mm or 1.8 mm record | Dimensional consistency across sample lot | Unknown flex behavior |
| Bottom bracket thickness | Check 3.75 mm record | Bracket maintains square seating | Cable misalignment at door bottom |
| Galvanized finish | Inspect face, edge, groove, and punched areas | No severe exposed base areas before use | Early edge corrosion sensitivity |
| Rotation behavior | Slow cable-contact rotation | No obvious catching, wobble, or scraping | Noise and accelerated local wear |
Часто задаваемые вопросы (FAQ)
How to install a garage door spring?
A garage door spring stores high mechanical energy, so installation is not a casual DIY task. The pulley should only be reviewed after the spring system is safe and balanced. If spring tension is wrong, the pulley may show cable tracking issues that are caused by system imbalance rather than pulley selection.
How long do garage door openers last?
Garage door opener life depends on motor quality, door balance, maintenance, and operating frequency. A misaligned pulley or cable path can increase resistance and make the opener work harder. Inspect the pulley, cable, track, and spring balance before blaming the opener alone.
How to replace garage door torsion spring?
Torsion spring replacement is high-risk because stored energy can cause serious injury. Use a qualified technician. After spring replacement, the pulley should be checked for cable centering, smooth rotation, and bracket alignment because new tension settings can reveal cable-path problems.
How to program LiftMaster garage door openers?
Programming an opener is an electrical control task, not a pulley task. Yet the door should move smoothly before opener programming is judged successful. If the cable path is off-center or the pulley binds, the opener may stop, reverse, or strain even when programming is correct.
How to reprogram garage door keypad?
Keypad reprogramming controls access, but it does not solve mechanical resistance. If the keypad works and the door still moves poorly, inspect mechanical parts such as springs, cables, tracks, and pulleys. A replacement pulley should be compared by size, thickness, rotation, and cable fit.