Garage Door Lift Handle Messaging for Replacement Risk
Reference Standard: Relevant material and performance testing standards may include ASTM B117 corrosion exposure concepts, ASTM D638 plastic tensile property concepts, and ISO 9227 corrosion atmosphere references. These standards are useful as external testing references only; they are not stated as catalog test results for the listed lift handles.
Short Answer
Reading Lift Handles As Replacement Coordinates, Not As Simple Door Accessories
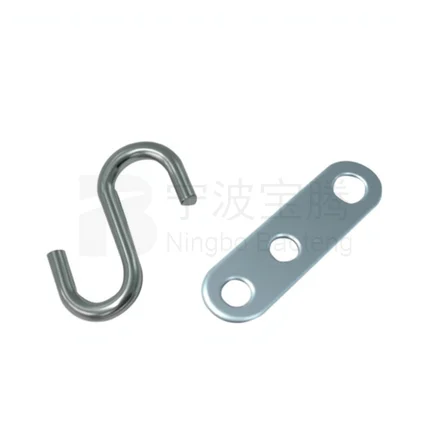
A garage door lift handle looks like a small replacement part, but the first technical message is not appearance. It is the coordinate relationship between the new handle and the old door panel. The catalog gives two measurable layout anchors: BT-L705 uses mounting holes 5-1/2 inch on centers, while BT-L706 uses mounting holes 105 mm on centers. Those values are not interchangeable. One belongs to an inch-based replacement path, and the other belongs to a metric layout path. For a buyer replacing a handle on an existing garage or industrial door, the real question is not whether the handle looks close enough. The question is whether the mounting centers fall onto the same two points already formed in the door skin.
This is a messaging problem because lift handles are often selected visually. A buyer may see a similar handle shape, assume compatibility, and only discover the mismatch when the old holes fail to line up. In a replacement coordinate model, the door panel becomes the fixed map, while the handle becomes the part that must match that map. 5-1/2 inch on centers and 105 mm on centers should therefore be written as decision anchors, not as secondary catalog details.
A useful edge-scenario model is a weathered garage door that has already been drilled once, repainted once, and slightly distorted around the original handle location. In the early stage, the installer may only notice that the screws enter at a slight angle. In the middle stage, the handle can sit under uneven contact pressure because one mounting point is trying to correct the position of the other. In the stress stage, repeated pulling can enlarge the old hole edge or compress the local panel surface. This model does not require any invented pull-force number. It follows a simple mechanical principle: when a part with fixed mounting centers is forced onto a different coordinate system, the mounting area absorbs the error.
A cross-dimensional comparison also helps. In a new-door installation, the installer can create holes after reading the handle. In a replacement installation, the handle must read the door. That reversal changes the entire content angle. A new installation can tolerate more layout planning, while a replacement project punishes even a small mismatch because the old panel already has holes, wear marks, paint boundaries, and sometimes hidden reinforcement behind the skin.
For a product page or buying message, the strongest phrasing is not “easy to install.” A more accurate message is: verify whether the existing door panel matches 5-1/2 inch mounting centers for BT-L705 or 105 mm mounting centers for BT-L706 before selection. This creates a factual, low-risk copywriting angle. It also avoids overstating fitment where the catalog does not provide screw-hole diameter, screw type, washer size, or door-skin clearance.
KEY TAKEAWAYS
- A handle may look correct but still fail if the old door panel does not match the listed mounting centers.
- Slight screw-angle correction during installation is an early warning sign of coordinate mismatch.
- Paint shadows, enlarged old holes, or uneven seating marks can signal that the handle is being forced into the wrong layout.
Where Surface Identity Changes The Maintenance Calendar
The second message layer is surface identity. The confirmed catalog data separates the lift handle range into different material or finish paths: BT-L705 has a galvanized finish, while BT-L707 and BT-L708 are ABS material. The catalog does not assign a material to BT-L706 beyond identifying it as an industrial black lift handle with 105 mm mounting holes on centers, so its material should not be invented. This distinction matters because a maintenance calendar is not built only from use frequency. It is also shaped by how the handle surface reacts to moisture, sunlight, hand contact, dust, and temperature cycling.
Galvanized finishing depends on zinc-based sacrificial protection. In practical terms, the zinc layer helps protect the underlying metal from corrosion by reacting preferentially under many exposure conditions. The risk appears when the surface is scratched, cut, abraded, or damaged around an edge. The first visible sign may be dulling, white corrosion product, or rust beginning at exposed steel zones if the protective layer is compromised. That is not a catalog test result for BT-L705; it is a general material behavior connected to the fact that BT-L705 is listed with a galvanized finish.
ABS behaves through a different aging logic. ABS is a thermoplastic polymer. Under outdoor-edge conditions, it may face ultraviolet exposure, heat cycling, cold mornings, hand oils, impact, and repeated bending around screw zones. The first concern is not red rust, because ABS is not a ferrous metal. The concern is loss of toughness, surface chalking, stress whitening, or crack initiation around molded corners and fastening areas. Again, this should be described as material-based reasoning rather than as a claim that BT-L707 or BT-L708 has passed a specific UV aging test.
A practical extreme-environment timeline can be described this way. During the initial exposure period, a galvanized handle may mainly show fingerprints, water marks, or minor surface abrasion, while an ABS handle may show little visible change. During the midlife period, scratched galvanized areas deserve closer inspection, while ABS handles deserve attention around corners, screw zones, and surfaces exposed to direct sun. During the severe exposure period, the galvanized route is more about corrosion pathway control, while the ABS route is more about toughness retention and crack prevention.
The cross-dimensional test case compares two doors: one shaded interior industrial door and one exterior garage door exposed to rain splash and afternoon sun. The shaded interior setting may make ABS more stable because UV load is lower. The exterior setting may favor a properly preserved galvanized surface where corrosion resistance is more relevant. This does not mean one material is always superior. It means the content should explain where each surface identity changes inspection frequency.
| Confirmed catalog path | Known data point | Main exposure concern | Practical inspection focus |
|---|---|---|---|
| BT-L705 lift handle | 5-1/2 inch mounting centers, galvanized finish | Scratched zinc protection and moisture exposure | Surface continuity, burrs, edge damage, rust signs |
| BT-L706 industrial black lift handle | 105 mm mounting centers | Material not confirmed in the input data | Coordinate fit, surface condition without material claims |
| BT-L707 lift handle | ABS material | UV, heat cycling, stress concentration | Cracks, whitening, corner damage, screw-zone deformation |
| BT-L708 lift handle | ABS material | Aging under repeated handling and outdoor exposure | Molded surface condition, breakage risk, dimensional stability |
This section supports a messaging-style title because it turns material data into maintenance language. For garage door hardware selection, the copy should not say that every handle is suitable for every exposure condition. It should present the known finish and material facts, then recommend inspection logic based on the environment.
Small Handles, Large Panel Consequences
A lift handle does not work alone. It transfers human pulling force into the door panel through its mounting points. The confirmed catalog data again matters: BT-L705 uses a 5-1/2 inch mounting-center layout, BT-L706 uses a 105 mm mounting-center layout, and BT-L707 / BT-L708 are ABS lift handles. These facts are enough to build a responsible panel-side risk model without inventing screw diameter, pull-force values, panel thickness, or reinforcement structure.
The mechanism is basic but often overlooked. When a user pulls a garage door handle, the handle body receives the hand force first. That force then moves through the handle geometry toward the fasteners. From there, it enters the door skin. If the handle is correctly seated, the load path is more balanced between the two mounting points. If the handle sits unevenly, if the old holes are enlarged, if the screw head does not seat well, or if the rear surface lacks support, the force can concentrate around one side. Concentrated force is more damaging than distributed force because it creates higher local pressure at a smaller area.
A useful edge scenario is a door used by several people every day, where one person pulls straight and another pulls at an angle. During the early period, the handle may only show minor movement. During the middle period, the door surface around one mounting point may show slight compression, paint cracking, or a change in screw tightness. During the severe stage, the handle can begin to feel loose even if the handle material itself is not visibly broken. This sequence is not a claim of a measured laboratory result. It is a mechanical explanation of how repeated loading can move from handle contact into panel-side deformation.
The comparison case is between a rigid panel with clean, aligned holes and a repaired panel with uneven old holes. The same lift handle can behave differently because the receiving structure is different. In the first case, the handle is more likely to sit flush and distribute pulling force. In the second case, the handle may act like a lever against damaged or misaligned openings. This is why product content should not isolate the handle from the door skin. The part is small, but its installed behavior belongs to a larger structural system.
This is also where ABS requires careful phrasing. For BT-L707 and BT-L708, the known material is ABS. ABS may be appropriate for lighter-duty or non-load-critical manual grip applications, depending on installation and exposure. The content should not claim heavy-duty pull capacity unless controlled pull-test records exist. A galvanized handle such as BT-L705 may support a different surface and corrosion story, but the catalog input still does not provide measured load rating. Responsible copywriting keeps those limits visible.
PRO-TIP / CHECKLIST
- Measure the existing door panel mounting centers before choosing between the 5-1/2 inch and 105 mm paths.
- Inspect old holes for elongation, paint cracking, compression marks, or hidden repair filler.
- Do not convert ABS material into a heavy-duty load claim without pull-test data.
- Check galvanized surfaces for scratches, edge burrs, and exposed metal areas before installation.
- Confirm whether the screw head seats cleanly against the handle without rocking or point loading.
- Request mounted photos when replacing handles on older or repaired door panels.
- Separate new-door installation language from replacement-door language in product copy.
- Avoid using appearance alone as the selection rule for industrial or exterior door applications.
A Supplier Check Sheet Built Around Missing Proof
The final content layer should be built around evidence that is known, evidence that is missing, and evidence that should be requested before stronger claims are made. The known facts are clear: BT-L705 has 5-1/2 inch mounting holes on centers and a galvanized finish; BT-L706 has 105 mm mounting holes on centers; BT-L707 is ABS material; BT-L708 is ABS material. These facts are enough to build useful purchasing and inspection copy. They are not enough to claim a specific pull-force rating, screw compatibility range, UV aging grade, corrosion test duration, or installed door clearance.
A practical supplier check sheet should begin with dimensional confirmation. The first inspection item is mounting-center distance. That is because a lift handle with a correct surface and attractive shape still fails the project if the center distance does not match the panel. The second item is screw-hole diameter, which is not provided in the catalog data. Without that value, the buyer cannot confirm fastener fit confidently. The third item is screw head seating behavior. A screw head that contacts the handle unevenly can create point pressure, especially on ABS handles or handles installed over imperfect door surfaces.
The fourth item is handle clearance from the door skin. Clearance determines whether fingers can grip properly and whether the handle interferes with surface movement or nearby hardware. Since the input does not provide clearance data, the page should identify it as a required supplier confirmation rather than an assumed feature. The fifth item is controlled pull-force response. This should include mounted photos, fastener samples, and repeatable test records if the supplier wants to support stronger performance messaging.
A cross-dimensional comparison is useful here: catalog data can answer “which model has which known feature,” while supplier evidence answers “how the part behaves when installed.” These are different proof layers. Catalog data gives fixed identity. Testing data gives installed confidence. A professional product page should not blur the two.
| Validation item | Confirmed or missing | Why it matters | Suggested evidence type |
|---|---|---|---|
| Mounting-center distance | Confirmed for BT-L705 and BT-L706 | Controls replacement coordinate compatibility | Dimensional inspection record |
| Galvanized finish | Confirmed for BT-L705 | Supports corrosion-related maintenance messaging | Surface inspection or finish photos |
| ABS material | Confirmed for BT-L707 and BT-L708 | Shapes aging, crack, and impact-risk language | Material declaration and molded-part inspection |
| Screw-hole diameter | Not provided | Controls fastener compatibility | Drawing, gauge check, screw sample test |
| Screw head seating behavior | Not provided | Affects local pressure around fastening points | Mounted photo and seating observation |
| Handle clearance from door skin | Not provided | Affects grip usability and interference risk | Side-view drawing or installation photo |
| Controlled pull-force response | Not provided | Supports or limits load-related claims | Repeatable pull-test record |
The four practical solutions should be treated like a small acceptance white paper.
Solution 1: Model-level separation before quotation.
Execution Protocol: Separate BT-L705, BT-L706, BT-L707, and BT-L708 in quotation and product copy before discussing price or replacement suitability. The buyer should see the specific model, the known mounting-center data, and the known surface or material identity in the same decision block.
Expected Material Behavior: This does not change the material itself, but it reduces installation stress by preventing forced fitting. A handle installed on the correct coordinate path is less likely to experience asymmetric seating pressure.
Hidden Cost and Side-Effect Control: The extra cost is slower inquiry handling because the seller must ask for measurements. The benefit is fewer wrong-part shipments and fewer replacement disputes.
Solution 2: Finish and molded-surface inspection.
Execution Protocol: For galvanized handles, inspect visible finish continuity, burrs, scratches, and edge damage. For ABS handles, inspect cracks, whitening, sink marks, sharp molded edges, and deformation around screw zones.
Expected Material Behavior: A preserved galvanized surface keeps the protective concept more coherent. A clean ABS molded body reduces early crack initiation points.
Hidden Cost and Side-Effect Control: Excessive cosmetic rejection can slow packing. The control is to define functional defects separately from minor visual variation.
Solution 3: Installation fit simulation without invented load ratings.
Execution Protocol: Use sample fasteners and a representative panel or fixture to check whether the handle seats evenly. Record whether the screw head contacts the part cleanly and whether the grip area clears the door surface.
Expected Material Behavior: Better seating distributes force more evenly across the mounting area. This reduces the chance that repeated handling concentrates stress at one local point.
Hidden Cost and Side-Effect Control: A fixture can create false confidence if it does not resemble the buyer’s real door. Ask for mounted photos when replacement conditions are uncertain.
Solution 4: Evidence-gated marketing language.
Execution Protocol: Use confirmed catalog language for mounting centers, galvanized finish, and ABS material. Reserve heavy-duty, high-load, or outdoor-lifetime claims until drawings, fastener samples, mounted photos, and pull-test records are available.
Expected Material Behavior: This protects the accuracy of the message rather than changing the part. It keeps material expectations aligned with documented proof.
Hidden Cost and Side-Effect Control: Restrained copy may sound less aggressive, but it lowers the risk of unsupported performance claims and improves technical trust.
Frequently Asked Questions (FAQ)
How long should a garage door last?
A garage door can last many years, but handle performance depends on installation condition, surface exposure, and panel integrity. For lift handles, replacement risk often starts at the mounting area, especially when old holes are worn, misaligned, or exposed to moisture.
How to choose your garage door hardware?
Start with measurable fit. For these lift handles, compare the existing panel holes with 5-1/2 inch mounting centers for BT-L705 or 105 mm mounting centers for BT-L706. Then check whether galvanized finish or ABS material suits the exposure environment.
How to reengage a garage door?
Reengaging a garage door usually relates to the opener or release mechanism, not the lift handle itself. A lift handle should only be treated as a manual grip component unless the door system documentation confirms a direct mechanical release function.
How to adjust springs on a garage door?
Spring adjustment is a high-risk task and should not be inferred from lift handle data. These handles are grip and replacement hardware items. Spring tension work requires correct tools, trained handling, and system-specific safety procedures.
How do I program a LiftMaster garage door remote?
Remote programming is unrelated to the lift handle specifications. BT-L705, BT-L706, BT-L707, and BT-L708 data concerns mounting centers, finish, or material, not opener electronics or remote-control pairing.
How to reset your garage door opener?
Garage door opener reset procedures depend on the opener model. Lift handles do not provide reset functions. When diagnosing a door system, separate manual hardware issues from opener electronics, spring balance, track alignment, and remote-control settings.