Why Does My Garage Door Top Bracket Keep Failing?
Reference Standard: DASMA 102 (Specifications for Sectional Doors) and ASTM B117 (Standard Practice for Operating Salt Spray Apparatus)
Short Answer
Kinematic Trajectory Deviations: The Transverse Shear Vector in Track Misalignment
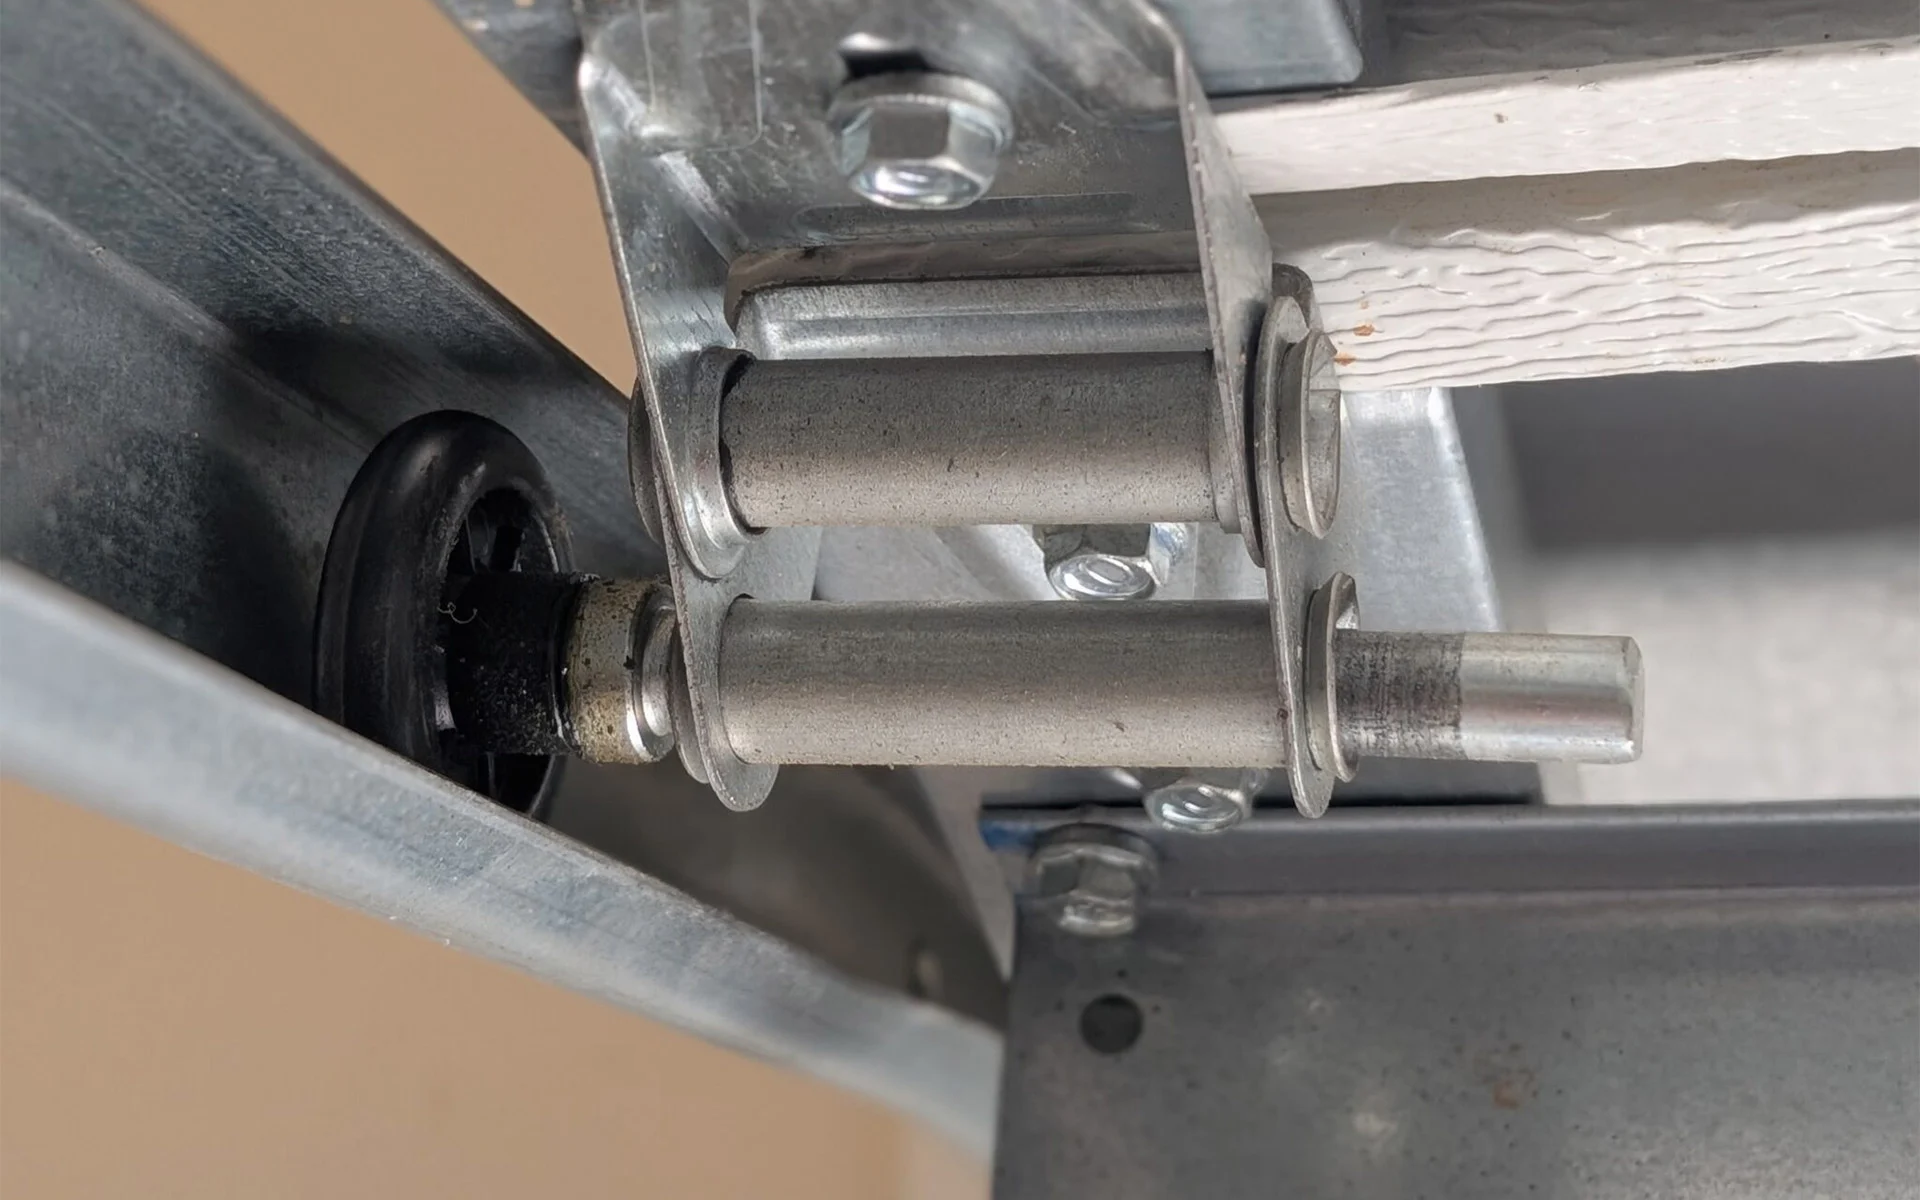
When homeowners or technicians observe a bent or torn top roller bracket, they incorrectly assume the automatic opener simply exerted too much axial pulling force. However, the true mechanical failure originates from kinematic trajectory deviations within the vertical and horizontal track assembly.
When a standard garage door operates, the opener arm is designed to pull the top panel in a perfectly straight line along the Y-axis. However, if the track installation suffers from even a microscopic vertical deviation—such as a 2 to 3-degree outward camber—the physics of the lift change entirely. As the door travels upward and hits the radius of the track, the straight-line pulling force of the motor clashes with the angled track. This misalignment decomposes the axial force, generating a massive “Transverse Shear Vector.” Instead of simply pulling the door up, the motor is now violently twisting the heavy duty garage door bracket sideways.
Using a kinematic force model, we can observe that a mere 2.5-degree track misalignment on a heavy insulated door generates over 150N of parasitic lateral tearing force directly against the bracket’s weakest point: the folded hinge sleeve holding the roller stem. Because standard 14-Gauge raw steel is engineered to withstand vertical tension, not lateral twisting, this continuous transverse shear stress initiates rapid fatigue.
We can trace this dynamic failure through a simulated 10,000-cycle fatigue test. In the initial phase (Cycles 0-2,000), the transverse shear causes micro-yielding at the 90-degree bend of the bracket base, visually presenting as a slight widening of the roller slot. During the intermediate phase (Cycles 2,000-6,000), the constant twisting work-hardens the steel at the pivot point, turning it dangerously brittle. The bracket begins to audibly “pop” or “creak” as the metal struggles to absorb the eccentric load. In the ultimate failure phase (Cycles 6,000+), the brittle metal reaches its fracture toughness limit. A macroscopic crack propagates entirely through the mounting flange, causing the bracket to violently shear off the door panel under tension.
This mechanical trajectory deviation initiates a severe cross-system hazard. When the top bracket shears, the uppermost panel loses its connection to the track. The entire weight of the door violently shifts downward, transferring immense, instantaneous shock loads to the lower hinges and the torsion spring assembly, frequently snapping the lifting cables in a cascading structural collapse.
KEY TAKEAWAYS
- Pre-failure Indicator 1: The top roller stem is visually seated at a severe, non-parallel angle within the bracket sleeve, indicating transverse shear forces are actively twisting the assembly.
- Pre-failure Indicator 2: A distinct metallic “popping” or “snapping” acoustic signature specifically as the top section transitions through the curved radius of the track.
- Pre-failure Indicator 3: The appearance of fine, jagged micro-cracks radiating from the circular mounting holes on the bracket face, mathematically proving the steel has exceeded its localized yield strength.
Tribocorrosion and Saponification: The Grinding Paste Matrix Inside Roller Sleeves
The second mechanism that destroys an adjustable top roller bracket is entirely chemical, occurring silently within the cylindrical sleeve holding the roller stem. High-humidity garage environments are subjected to severe temperature fluctuations. During winter months, warm, moist air inside the garage hits the freezing steel of the door panels, creating constant condensation.
This liquid water continuously seeps into the bracket sleeve. When water mixes with the cheap lithium-based grease often applied by installers, it triggers a chemical degradation process known as Saponification. The water breaks down the chemical thickeners in the grease, separating the base oil from the soap structure. The lubricant loses its viscosity and washes out, leaving behind a sticky, acidic residue.
This degraded residue acts as a magnet, actively pulling airborne silica dust and road salt into the tight clearance between the steel roller stem and the bracket sleeve. This mixture creates a highly abrasive “Grinding Paste Matrix.” As the door moves, the roller stem rotates and slides within the sleeve. The silica-infused paste aggressively machines away the protective zinc plating on both components.
Once the bare carbon steel is exposed, rapid oxidation (rust) occurs. We can quantify this failure: a healthy roller sleeve exhibits a dynamic friction coefficient of approximately 0.05. Once saponification occurs and the grinding paste takes hold, this friction coefficient instantaneously spikes to over 0.45. The roller stem requires immense force to slide. Eventually, the rust physically expands, occupying more volume than the original steel, and completely seizes the roller stem inside the bracket sleeve. When the motor pulls, the seized roller acts as a rigid pry bar, ripping the bracket straight off the door.
Advanced Engineering Countermeasures & Validation Standards
To mass-produce a replacement top fixture garage door capable of surviving both transverse shear vectors and severe tribocorrosion, manufacturing facilities must execute precise metallurgical and mechanical upgrades using advanced heavy machinery.
1. Cold-Worked Embossment via CNC Press Brakes
* Execution Protocol: The manufacturer must utilize high-speed punch presses and CNC bending machines to stamp deep, three-dimensional structural ribs directly into the flat profile of the 12 to 14-Gauge steel before it is folded.
* Material Expected Evolution: This cold-working process physically compresses the crystalline grain structure of the steel at the rib locations. Without adding any extra weight or thickness, this specific geometric topography increases the Section Modulus (resistance to bending) by over 300%, providing massive Z-axis specific strength to permanently resist transverse shear forces.
* Hidden Cost & Side Effect Avoidance: If the CNC press brake applies too much instantaneous tonnage during the stamping process, the rapid deformation will create micro-tears at the base of the rib. Tooling engineers must strictly control the punch velocity to ensure the steel flows plastically rather than fracturing.
2. Isotropic Zinc-Plating for Cathodic Protection
* Execution Protocol: Post-stamping, the bare steel bracket must undergo a commercial-grade electro-galvanization or hot-dip zinc plating process, ensuring a uniform protective barrier across all exposed surfaces, including the critical interior diameter of the roller sleeve.
* Material Expected Evolution: The zinc layer acts as a sacrificial anode. Even if the grinding paste matrix scratches the surface, the zinc will preferentially oxidize before the underlying carbon steel, preventing the rust expansion that causes the roller stem to seize.
* Hidden Cost & Side Effect Avoidance: Electroplating can trap hydrogen gas within the steel lattice, leading to catastrophic hydrogen embrittlement. The factory must execute a strict post-plating thermal baking cycle (e.g., 190°C for 4 hours) to outgas the hydrogen and restore the steel’s ductility.
3. Elongated Track Slot Geometry Calibration
* Execution Protocol: The CNC punch press must accurately strike elongated, slotted mounting tracks rather than fixed circular holes, allowing for micro-adjustments of the roller placement relative to the door face.
* Material Expected Evolution: This mechanical adjustability allows the installer to perfectly align the roller stem to compensate for existing vertical track deviations. By correcting the alignment, the transverse shear vector is mathematically reduced to zero, returning the system to pure, safe axial loading.
* Hidden Cost & Side Effect Avoidance: If the slots are punched too wide, the fastening bolts will slip under vibration. The slot width tolerance must be held to ±0.2mm to ensure the serrated flange nuts bite aggressively into the steel.
4. Accelerated Neutral Salt Spray (NSS) Auditing
* Execution Protocol: Quality control must extract random production samples and subject them to a continuous 96-hour Neutral Salt Spray (NSS) chamber test, bombarding the brackets with a highly corrosive 5% NaCl saline mist at 35°C.
* Material Expected Evolution: This aggressive chemical testing validates the exact porosity and thickness of the zinc plating. A passing grade ensures the bracket can survive harsh coastal environments or heavy road-salt exposure without initiating localized pitting corrosion.
* Hidden Cost & Side Effect Avoidance: Testing components immediately after plating can yield false positives. Brackets must cure for at least 24 hours to allow the zinc passivation layer to fully stabilize before entering the NSS chamber.
| Component Vector | Expected Baseline Performance | Accepted Industry Tolerance | Testing Standard & Failure Metric | Cross-Variable Risk |
|---|---|---|---|---|
| Material Base | 14-Gauge Carbon Steel | ± 0.05mm thickness variance | ASTM A1008 (Failure = premature yielding) | Thinner steel warps under transverse shear |
| Corrosion Barrier | 96-Hour rust resistance | < 5% red rust surface area | ASTM B117 (Failure = deep pitting) | Insufficient zinc allows rapid saponification |
| Bracket Geometry | CNC Cold-Worked Ribs | ± 0.5mm rib depth | 3D Laser Scanning (Failure = flat profile) | Flat brackets bend under motor tension |
| Roller Sleeve | Dynamic Friction < 0.1 | ± 0.02 coefficient drift | Tribometer Test (Failure = stem seizing) | Saponified grease creates grinding paste |
| Mounting Slots | Zero slip under 500N load | < 1mm displacement | Tensile Pull Test (Failure = bolt sliding) | Oversized slots ruin kinematic alignment |
PRO-TIP / CHECKLIST
- The Magnet Test: Always verify the steel gauge. If a heavy rare-earth magnet easily slides off or feels weak against the bracket, the manufacturer has substituted inferior, thin-gauge sheet metal that will instantly warp under shear force.
- Examine the Ribs: Run your thumb across the face of the bracket. Demand deep, clearly defined stamped reinforcement ribs. A completely flat bracket face indicates a cheap, low-strength stamping process.
- Check the Sleeve Clearance: Insert a new roller stem into the bracket sleeve. It should slide smoothly but without excessive radial play. A loose, sloppy fit will accelerate the ingress of silica dust and moisture.
- Audit the Lubricant: Never use thick, lithium-based greases on the roller stem inside the bracket. Always apply a dry, PTFE-based or silicone spray lubricant to prevent saponification and the formation of grinding paste.
- Verify the Plating Quality: Inspect the interior edges of the punched slots. If you see dark, raw steel edges, the manufacturer punched the holes after galvanizing, completely destroying the corrosion barrier at the most critical stress points.
- Execute a Track Plumb Test: Before tightening the top bracket, use a 4-foot digital level to ensure the vertical tracks are perfectly plumb. Correcting the track angle is the only way to eliminate the root cause of transverse shear vectors.
Frequently Asked Questions (FAQ)
How do I reset a Chamberlain garage door opener after replacing a broken top bracket?
After structural repairs, you must force the logic board to relearn the travel limits. Locate the ‘Learn’ or ‘Adjustment’ button on the motor head, hold it until the LED flashes, and use the wall control to set the new optimal “Up” and “Down” force parameters to accommodate the new bracket geometry.
How to connect a garage door remote to a newly reinforced track system?
Reinforcing the hardware does not alter RF frequencies. Simply press and immediately release the ‘Learn’ button on the opener’s motor head (the indicator LED will glow steadily), then within 30 seconds, press and hold the button on your handheld remote until the opener lights flash.
What is an HPC garage door opener in relation to lifting power?
HPC stands for Horsepower Comparable, a metric used for DC motors to equate their lifting force to traditional AC motors. A 3/4 HPC motor applies immense torque; if your door features weak, non-ribbed top brackets, this high torque will rapidly induce transverse shear failure.
How to program a garage door remote to a car (HomeLink) safely?
Simultaneously press the desired HomeLink button in your vehicle and the button on your active handheld remote until the car’s indicator light flashes rapidly. Then, press the ‘Learn’ button on the garage motor head, and immediately return to the car and press the programmed HomeLink button twice to sync the rolling code.